用第三方拖拽庫快速擼一個可視化搭建平臺
之前一直在研究可視化和零代碼搭建相關產品和技術, 最近逛 github 的時候發(fā)現(xiàn)一個比較有意思的拖拽開源組件, 就用 vue3 簡單擼了一個拖拽搭建的小demo, 供大家參考學習.

可視化拖拽demo項目介紹
空閑時間簡單設計了幾個功能, 如下:
- 支持設置拖拽單位(閾值)
- 支持撤銷重做
- 支持導入和導出 json
- 支持組件全選 / 組合
- 技提供了常用的四個基礎組件(文本, 圖片, 音頻, 視頻)
因為之前我的技術棧主要是react, 為了讓更多小伙伴低成本的上手, 這里項目采用大家比較熟悉的vue3 + vite.
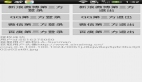
項目采用的拖拽開源庫 es-drager, 當然為了更好的顯示代碼, 也使用了 monaco-editor, 如下是它的代碼展示效果:
 圖片
圖片
整體來說展示效果還是不錯的, 為開源作者們點贊.
完整項目倉庫地址: https://github.com/MrXujiang/vue3-drag-demo
線上演示地址: drag_demo 可視化拖拽
一些技術實現(xiàn)的介紹
上面的demo主要實現(xiàn)思路拆解如下:
- 實現(xiàn)組件從左側面板拖拽到畫布
- 組件在畫布中的移動, 操作(全選, 拉伸, 旋轉, 參考線等)
- 組件屬性的配置
- 可視化的相關操作(導入, 導出, 撤銷, 重做等)
1.實現(xiàn)組件從左側面板拖拽到畫布
這里實現(xiàn)也很簡單, 我們采用H5的原生api: drag & drop 來實現(xiàn). 也就是說從左側面板拖拽到畫布, 本質上是數(shù)據(jù)的移動.
 圖片
圖片
我們先定義好左側面板的組件類型:
const typeList = reactive(['文本', '圖片', '音頻', '視頻'])然后再設置拖拽到畫布的事件行為:
<div class="menu">
  <div
    v-for="item in typeList"
    @click="push(item)"
    :draggable="true"
    @dragstart="addType = item"
  >
    {{ item }}
  </div>
</div>
相關事件:
// 添加
function push(type: string) {
  isupd.value = true;
  switch (type) {
    case '文本':
      data.value.push({
        id: uuid(),
        type: 'text',
        value: '輸入文本',
        width: 200,
        height: 50,
        angle: 0,
        ...addDistance.value
      })
      reset()
      break;
    case '圖片':
      data.value.push({
        id: uuid(),
        type: 'image',
        value: 'https://turntip.cn/uploads/sucai/11_189dd429f23.webp',
        width: 100,
        height: 100,
        angle: 0,
        ...addDistance.value
      })
      reset()
      break;
    case '音頻':
      data.value.push({
        id: uuid(),
        type: 'audio',
        value: 'https://turntip.cn/uploads/sucai/Just Relax_189bfc7d990.mp3',
        width: 300,
        height: 50,
        angle: 0,
        ...addDistance.value
      })
      reset()
      break;
      // ...
  }
}
最后在畫布上監(jiān)聽拖放事件, 獲取“傳遞的數(shù)據(jù)”.
// 拖進畫布的回調
function drop(e: any) {
  addDistance.value = {
    top: e.layerY,
    left: e.layerX
  }
  push(addType.value);
}
通過這樣的操作, 我們就可以將組件從左側輕松拖拽到畫布的指定位置了.
當然實際的低代碼設計往往比現(xiàn)在設計的復雜很多, 這里主要是為了方便大家快速理解.
2. 支持組件全選 / 組合
全選和組合實現(xiàn)的思路其實本質上是對數(shù)組的操作. 全選的過程中, 我們需要先捕獲全選的區(qū)域坐標, 然后過濾出這個區(qū)域內的組件, 然后批量更新數(shù)組中每個選中元素的選中狀態(tài):
 圖片
圖片
這里分享一下實現(xiàn)元素組合的邏輯:
// 組合
function handleMakeGroup() {
  const selected = data.value.filter(item => item.selected && item.type != 'combination');
  if (selected.length > 1) {
    let value: any[] = JSON.parse(JSON.stringify(selected));
    const Unchecked = data.value.filter(item => !item.selected);
    const top = selected.sort((x, y) => x.top - y.top)[0].top;
    const left = selected.sort((x, y) => x.left - y.left)[0].left;
    const widthArr:number[]=[];
    const heightArr:number[]=[]
    selected.forEach(v=>{
      widthArr.push(v.left+v.width-left);
      heightArr.push(v.top+v.height-top)
    })
    const width=widthArr.sort((x,y)=>y-x)[0];
    const height=heightArr.sort((x,y)=>y-x)[0];
    value = value.map(v => ({
      ...v,
      top: v.top - top,
      left: v.left - left
    }))
    const obj = {
      id: uuid(),
      top,
      left,
      width,
      height,
      selected: true,
      value,
      type: 'combination',
      angle: 0
    }
    data.value = [...Unchecked, obj]
  }
}
具體實現(xiàn)代碼大家可以參考我創(chuàng)建的 github 倉庫.
至于其他幾個功能比如撤銷重做, 導入導出, 都是很基本的操作, 網(wǎng)上也有很多分享, 這里直接上代碼:
// 純前端導入并讀取文件
function insert({ file, index }: any) {
  // 創(chuàng)建 FileReader 對象
  const reader = new FileReader();
  reader.onloadend = function () {
    data.value[index].value = reader.result;
  };
  // 讀取文件并觸發(fā) onloadend 事件
  reader.readAsDataURL(file);
}

// 導出文件
function download() {
  const content = editorRef.value.save();
  const jsonData = JSON.stringify(content);
  const downloadLink = document.createElement('a');
  downloadLink.setAttribute('href', 'data:text/json;charset=utf-8,' + encodeURIComponent(jsonData));
  downloadLink.setAttribute('download', 'data.json');
  downloadLink.click();
  visible.value = !visible.value;
}
當然項目還有很多不足和需要完善的地方, 歡迎大家一起共建.
 圖片
圖片
完整項目倉庫地址: https://github.com/MrXujiang/vue3-drag-demo
線上演示地址: drag_demo 可視化拖拽